Hello
It's all about Holiday Baking.....
I've decided to share some great tips for baking, cooking and any kitchen tips to help in all your holiday baking.
Please pass on your great tips old or new that will help our baking community..
Here are a few great tips from my kitchen.
-To get a nice smooth icing on your cake, always do a quick crumb coat first. First let your cake cool after baking. Take a little of your icing and put in a separate bowl (in case you get crumbs in it!) Ice your cake with your little bowl of icing, again don't worry on how it looks or how many crumbs you see on your cake AND Ice thinly. Put in the fridge until your cake is cold (about 1/2 hour)
Take out and ice with the remaining clean (crumb free) icing. Your final icing should go on nice and smooth over your crumb coat.
-Want a quick easy icing for cookies or cupcakes. Take your bag of chocolate chips (any kind-white or chocolate) and melt in hot water. DO not boil, but rather put in a bowl in the sink and add some hot water out of the tap. Massage it until your chocolate is melted-it'll take a few minutes, so mold it every minute or two. Take a pair of scissors and cut the corner off. IF you want to use it to write with, cut a small hole, if you want to make some designs cut a larger hole and voila!
An instant decorating bag with chocolate.
-Colour your coconut..... Take a clean empty jar and fill it half way with coconut (any kind will do) Add a couple drops of food colouring and shake well. Add red or green for your festive decorating. You can also decorate sugar in the same way to make coloured sugar to sprinkle over cookies or cupcakes.
-When cooking or baking with sticky gooey things like peanut butter or molasses, spray your measuring cup with non-stick spray first and it'll come out much easier.
-Love baking with blueberries or other fruit but they always sink to the bottom of your cake or cupcake?? Simply wash your berries and dust them in flour and then mix them gentley into your batter. Your berries will now be evenly spread in your cake or cupcake.
Got a great tip... Pass it on.
Please stay tuned for other great tips
Christina
www.christinascakecreations.ca
Sugar Roses

Monday, December 02, 2013
Thursday, October 03, 2013


Fall Arrangements
Wow it's been a busy few months. Apologies for all my friends reading my blogs.I'm right in the middle of making some beautiful fall arrangements out of sugar and wanted to share.
I'm using a variety of sugar roses in orange, yellows and reds, I added some sugar maple leaves to some of the arrangements and coloured them in the same beautiful colours of fall.
Please let me know if you'd like the instructions for the fall leaves, these have been fun to do and make a nice touch to any sugar arrangement.


Wednesday, July 03, 2013
Sugar Classes
Sugar Flower Classes
Space is still available for our sugar flower classes.
On July 20th I'm teaching the beautiful Sugar Rose and Orchid
On July 21st I'm teaching the Gerber Daisy and Orchid
Please visit www.christinascakecreations.ca for all the details.

Thursday, June 06, 2013
The beauty of Black and White wedding cakes.
As I meet with my brides to find their perfect cake vision I am often asked about black and white cakes. Although I've talked to brides about black and white designs I have never done a black and white cake! I have done some lovely sugar flowers in black, but I hope one day to take on a cake and look forward to bringing a brides vision to life. But in the mean time I have decided to add (to my collection of pictures) some beautiful black and white cakes. Again these are not my creations but I think are some stunning classic looks that deserve to be shown and shared again.
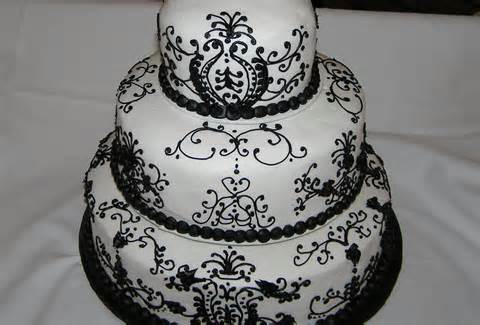
This next one is not the traditional round cake but square cakes. Nicely done with dark flowers and lovely piping. I really like the dividers with a single black ribbon going down the side.


Here are some other note-worthy pictures of unique black and white ideas:


Thanks for reading-- please share your ideas and pictures.
Christina
Christina's Cake Creations
Ottawa, Ontario
www.christinascakecreations.ca
Sunday, June 02, 2013
Sugar Flower Classes
We are holding 2 one day classes in July. Sign up for one or join both.
Saturday July 20th-Sugar Rose and Orchid
Sunday July 21st-Tiger Lily and Gerber Daisy
www.christinascakecreations.ca
Sugar Rose and Orchid
Join our one-day Rose and Orchid class. This class will teach the fundamentals of gum paste, tools, techniques and bring out your creative flair. We are making a large rose, bud, leaves and a beautiful large Orchid.
Two beautiful flowers great for any occasion.
You don't have to be an expert but you will walk away feeling like one!
Date: This is a 1 day class
Saturday July 20th 2013
Time: 9 a.m to 5 p.m
Where: Comfort Inn
222 Hearst Way, Kanata
Cost: $125


Tiger Lily and Gerber Daisy
Join our 2nd one-day class on Sunday July 21st and learn the exotic Tiger Lily. Beautifully coloured in orange and brown. A large Lily, leaves and a bud will make up the arrangement. Also learn Gerber Daisies. These are large bright cheerful flowers that make beautiful gifts and wedding flowers.
Date: This is a one-day class
Sunday July 21st 2013
Time: 9 a.m to 5 p.m.
Where: Comfort Inn
222 Hearst Way, Kanata
Cost: $125


All classes are small in size for individual attention, minimum is 5.
-All classes will be held in Ottawa (Kanata), Ontario, Canada.
-Sign up soon to reserve your seat. Classes fill up quickly!
-Lunch and coffee is included for full day classes.
-Classes will start right on time, please don't be late.
-All tools and equipment needed for the class will be provided.
-The option to buy the tools used in class will be available.
-Complimentary instruction booklet will be given.
-A certificate will be given after completion.
-NO experience necessary!
Sign up early--space is limited
www.christinascakecreations.ca
Hope to See you there!!
Christina
Sunday, May 12, 2013


Tuesday, April 23, 2013
Rose and Calla Lily class held here in Ottawa
 | ||
| Our Class Roses |
Just a HUGE thank you to the ladies that joined our Rose and Calla Lilies class.
It was a great time!!
This past weekend I held a class here in Ottawa teaching the rose and calla lily sugar flowers. Using fondant, gum paste, tools and different techniques were discussed.
Stay tuned for our next class....
visit www.christinascakecreations.ca for our next class dates.
Space is limited for individual attention so sign up early for all sugar flower classes.
No experience necessary!
All supplies and tools for the class are provided
Have a flower you want to learn? Let me know!
Can't join a class? No worries! I offer private training in flowers, fondant, piping, gum paste and techniques in the Ottawa area


Friday, April 12, 2013

Sugar Shoes
I've discovered a new shoe cutter made by JEM. This cutter is great. It comes with some sponge shapes that you can use to dry your shoes and you have some choices in designs. What a cute shoe for a birthday cake!
Very happy with this cutter and I'm going to add it to my supplies that I sell at www.christinascakecreations.ca for you.
 | ||
| Gum Paste Shoes. Trying out some colours and designs |
If you use this cutter send me some different pictures to post.
Enjoy!
Christina
Tuesday, April 09, 2013
Sex in a Pan
A cooked version and uncooked version
This is one of my favourite desserts. I've written the original recipe, then I've put my version of it. I changed the bottom of it, since I like easy quick recipes.Ingredients:
Recipe makes a 9 x 13 pan.
Original recipe- cooked:
-1 cup flour (all purpose)
-2 tablespoons white sugar
-1/2 cup pecans (if you don't like pecans, walnuts are good or just leave the nuts out)
-1/2 cup butter. I love cooking with butter! Margarine works too.
-1 package of Cream Cheese, softened (an 8 oz package)
-1 cup icing sugar
-2 cups whipping cream OR store bought whip cream in tub.
-1 package of instant chocolate pudding mix.
-1 1/2 cups of milk for chocolate pudding
-1 package of instant vanilla pudding mix
- 1 1/2 cups of milk for vanilla pudding
Directions:
-preheat oven to 325 F (165 C)
-in a bowl mix the all the flour and all white sugar, add chopped nuts (if desired). Stir in melted butter (I always use the microwave for this). Margarine can be used instead of butter. Mix until all ingredients are combined.
-Press into the bottom of your pan. I always use my hands for this.
-Bake in preheated oven for 15 minutes. (Check after 12 minutes to see if its cooked). Allow to cool
-Beat together the cream cheese and icing sugar until nice and smooth. Spread this over the cooled crust.
-Spread 1 cup of whip cream over cream cheese layer.
-Make the instant chocolate pudding (using the 1 1/2 cups milk). Mix until smooth and a little stiff. Pour over whipping cream layer. Spoon evenly in pan.
-Rinse bowl and make the instant vanilla pudding (with 1 1/2 cups milk). Mix well and pour this over the chocolate layer. Use a spoon to spread evenly over chocolate pudding.
-Cover with remaining whip cream.
If you pause in between layers it's sometimes easier to spread the pudding and whip cream.
My other Version: NO COOKING involved.
-1 box of unsalted crackers. You won't use the whole box
-1 package of Cream Cheese, softened (an 8 oz pack)
-1 cup icing sugar
-2 cups whipping cream OR store bought whip cream in tub.
-1 package of instant chocolate pudding mix.
-1 1/2 cups of milk
-1 package of instant vanilla pudding mix
- 1 1/2 cups of milk
Directions:
-Take out your pan and layer your crackers so the whole bottom is covered with unsalted crackers. Leave no space and double if you want.
-Beat together the cream cheese and icing sugar until nice and smooth. Spread this over the crackers. Now this is the tricky part- the cream cheese layer is next.
I use a milk bag, slit the top (the top with the hole already), rinse it, spoon my cream cheese in and then cut a small hole on the bottom to kind-of pipe it on the crackers layer. Or use a piping (decorating bag) filled with cream cheese and just pipe to cover crackers.
-Make the instant chocolate pudding (using the 1 1/2 cups milk). Mix until smooth. Pour over cream cheese layer.
-Make the instant vanilla pudding (with 1 1/2 cups milk). Mix well and pour this over the chocolate layer. Let it set for a little bit to stiffen.
-Spread 2 cups of whip cream over vanilla layer.
Let this sit over night in the fridge. The soda crackers soften up really nicely and make a nice crust.
There are many more versions of this dessert, so let me know and I'll share along with mine.
Enjoy
Christina
Subscribe to:
Comments (Atom)